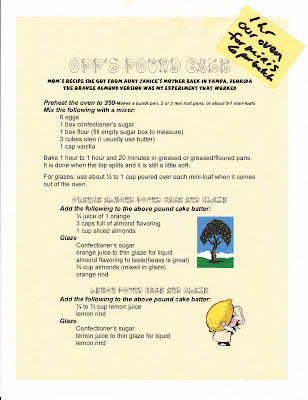
 My mom made this every year at Christmas and also other times. She learned it from a very dear friend in the Opp family. We now make it for Christmas and many other times as well in three different flavors: Lemon, Almond, and Orange.
Mom used to bake it in regular or long thin loaf pans. We cook it in mini loaf pans and always freeze it in plastic wrap tightly before serving if possible. There is something about freezing it that changes the texture. Freezing it also allows it to cut cleaner as it is partially thawed. Whatever the shape of the pan, make sure to make enough of the glaze to fill it to the top when the pan comes out of the oven while it is hot. As you pour in the glaze to soak, also pull apart the pan sides or gently use a spatula or knife to allow the glaze to sink down the sides so that the whole loaf can absorb the glaze. This is sort of like soaking a Rum Cake in rum, but we don't use alcohol in our family so the glaze does the same thing. Before wrapping the loaves to freeze, allow the loaf to soak most of the glaze in and cool to warm. Then empty the loaf onto the plastic wrap with any residual glaze and wrap tightly. Then freeze.
We made over 600 of them for a wedding using two Bundt tea Cake & Candy Mold pans and still had some left in the freezer 3 months later that tasted fresh when we pulled them out. They usually don't make it to the thawed stage because they are great frozen. They freeze well and about 36 of them store in each gallon ziplock bag for easy serving anytime. We made about 350-400 of them for another wedding and they worked out just as well.
The recipe to the right above is the same for both loafs and these smaller versions. The instructions below are notes from making them in the Tea Cake or Petit Four shapes.
One recipe of the pound cake is enough for about 2 pans of the tea cakes. Each pan makes 30 small cakes so one recipe is makes about 60 small cakes.
1. Preheat the oven and make the batter.
2. Lightly spray the pans with non stick spray(we use soy-free).
3. Lightly flour the pan or not. If you flour it, make sure to bang it upside down over the sink to get out excess flour or you might get a gross, dry clump of it when done.
4. Fill a gallon ziplock bag with batter and clip off one of the bottom corners a little.
5. Use the ziplock bag to pipe in batter to each shape of the pan. Fill them about 3/4 or so full. (It depends on weather, oven, and your flour.)
6. Thwack them on a counter a few times or on the back porch(please be sanitary) to get out bubbles. If you don't, then you will have air bubble holes on the finished products that are very noticeable since these are so small.
7. Put them in the oven to bake. I have to bake them in our gas oven on the top shelf or they get too brown before done. They look best when light but cooked. Bake till golden on the edges. It takes about 19 minutes in my oven.
8. Turn them out onto a bakers rack that is placed over a sheet cake pan or cookie tray. Set pan to side to cool while glazing.
9. Hand dip cakes in bowl of glaze and place on rack to drip and set. You could also spoon or pour glaze over cakes either while hot and then again a few minutes later, or wait a few minutes and glaze but still while warm. If they have glaze on all sides, including the bottom, they keep fresh longer.
10. Spray pans again, Refill with ziplock batter and start the process over again.
11. Allow the cakes to dry. Depending on humidity, it can take up to 3 hours but it is ok to freeze while still sticky. Place about 36 in gallon ziplock bag if not sticking to each other and freeze them flat.
I know I have missed something in here somewhere, but hope to update this as we make more. I also have pictures to upload sometime soon too.
This is how they look after they have been hand dipped and dried some. You can see the darker ones that were from the bottom shelf in the oven versus most that were baked on the top shelf.
These were finished and what fit on our serving plates. The dark ones to the side were from the batch cooked on the bottom rack. Some browning was fine when glazed but 4 or 5 of those look a little way to done so I'm guessing I gave those to the kids.


No comments:
Post a Comment